So, you’ve got your karaoke machine, but are you getting the most out of your vocal performances? Learning to optimize karaoke sound quality is crucial for an enjoyable experience, transforming your home setup into a professional-sounding stage. With technological advancements like AI-powered vocal tuning and pitch correction becoming more prevalent (expected in 35% of platforms by 2025), understanding the fundamentals of sound optimization will only enhance these smart features. Let’s dive into how you can achieve crystal clear vocals and a balanced audio mix every time.
The Foundation: Proper Setup and Placement
Before tweaking any settings, ensure your equipment is correctly positioned. This forms the bedrock of good sound quality. Proper placement significantly impacts your overall audio experience. In fact, many common sound issues can be resolved simply by adjusting your setup.
Microphone Mastery
- Proximity Effect: Hold the microphone close to your mouth (about 1-2 inches). This boosts low frequencies, making your voice sound fuller and richer. Too far, and you’ll sound distant and thin. Furthermore, maintaining consistent distance helps prevent volume fluctuations.
- Angle Matters: Don’t point the microphone directly into the main speakers. This is a common cause of feedback – that piercing squeal no one wants to hear. Aim for a slight angle away from the speakers. Consequently, this simple adjustment can dramatically reduce unwanted noise.
- Wireless Advantage: If you have wireless microphones, ensure they are fully charged and have a clear line of sight to the receiver to prevent dropouts. Remember the mobile-first experience trend? Your wireless freedom is part of that seamless, untethered enjoyment. For more on choosing the right equipment, consider exploring our Rankings for Those who Want to Buy the Best Karaoke Machine.
Speaker Placement for Optimal Sound
Speaker placement is just as critical as microphone technique. Thoughtful positioning can greatly enhance your audio. Therefore, take time to arrange your speakers properly.
- Elevate Your Sound: Position speakers at ear level or slightly above, angled towards your audience. This ensures the sound travels directly rather than getting absorbed by furniture or people. As a result, everyone in the room will hear the music clearly.
- Stereo Separation: If you have two speakers, place them a few feet apart for a wider, more immersive soundstage. Avoid placing them in corners, which can create boomy, undefined bass. Similarly, keeping speakers away from walls can improve clarity.
- Subwoofer Integration (Optional): If using a subwoofer, place it on the floor. Experiment with its position to find where the bass sounds most even throughout the room. Sometimes, even a small shift can make a big difference.
Fine-Tuning: EQ, Effects, and Volume Balance
Once physical setup is complete, it’s time to refine the audio. This stage involves adjusting settings on your machine or mixer. Getting these adjustments right will further improve karaoke audio quality.
Equalization (EQ) for Clarity
Many karaoke machines, mixers, or even smart apps offer EQ controls (Bass, Mid, Treble). Here’s a basic guide to help you optimize karaoke sound quality with EQ:
- Bass (Low Frequencies): Controls the warmth and fullness of your voice. Too much can make you sound muddy; too little makes you sound thin. Adjust minimally for richness. In addition, excessive bass can overpower other elements of the mix.
- Mids (Mid-Range Frequencies): This is where your voice’s clarity and presence lie. Too much can make you sound nasal or harsh; too little makes you sound distant. This is often the most critical band for vocal intelligibility. Consequently, careful attention here yields significant improvements.
- Treble (High Frequencies): Adds sparkle and air to your voice. Too much can sound hissy or sibilant; too little makes you sound muffled. Find a balance that provides clarity without harshness.
A good starting point is to set all EQ bands to flat (neutral) and make small adjustments from there. Listen carefully to how each change affects your vocals and the backing track. The goal is to make your voice stand out clearly without sounding unnatural. Moreover, different voices will require different EQ settings. You can learn more about general audio principles from sources like Sound On Sound, a respected industry publication.
Applying Effects Wisely
Effects can add a professional polish to your vocals, but overuse can ruin the sound. Use them sparingly and with purpose.
- Reverb: This simulates singing in a larger space. A touch of reverb can make your voice sound more natural and less dry. Too much, however, makes your voice sound distant and washed out. Experiment with short, subtle reverb settings first.
- Echo/Delay: Creates a repeating sound. This effect is great for specific stylistic choices but can quickly become messy if overdone. Use it for dramatic effect rather than constant application.
- Chorus: Makes your voice sound thicker, as if multiple voices are singing. This can add richness but might not be suitable for all songs.
Remember, the purpose of effects is to enhance, not mask. Listen to professional recordings for inspiration on how effects are used effectively. Many modern karaoke systems offer built-in effects, making it easier to experiment. To further refine your understanding of sound mixing, resources like the Audio Engineering Society offer valuable insights into professional audio practices.
Achieving Volume Balance
Proper volume balance between your microphone and the music track is paramount. Too loud on the vocals, and you drown out the song; too quiet, and you disappear into the background. Here’s how to get it right:
- Start Low: Begin with both the music and microphone volumes low. Gradually increase the music volume to a comfortable level.
- Bring in Vocals: Slowly raise the microphone volume until your voice sits comfortably on top of the music. Your voice should be clearly audible without overpowering the instrumental track.
- Listen and Adjust: Have someone else sing and listen from different parts of the room. This helps identify if the balance is consistent. You might need to adjust based on the singer’s vocal power.
Mastering volume balance is a key step to optimize karaoke sound quality. It ensures a cohesive and pleasant listening experience for everyone. In fact, it’s often the most overlooked aspect of home karaoke setups. Moreover, consistent volume levels prevent listener fatigue.
Advanced Techniques to Further Improve Karaoke Audio Quality
Beyond the basics, several advanced techniques can elevate your karaoke experience. These tips are particularly useful for those seeking a truly professional sound.
Microphone Techniques for Different Vocal Styles
Different singing styles benefit from specific microphone approaches. For example, a powerful belter might need to pull the mic back slightly to avoid clipping, while a softer singer might need to stay closer. Dynamic range is important here. Understanding your own vocal projection helps immensely. Consequently, practice with your microphone to discover what works best for your voice.
Understanding Room Acoustics
Your room’s acoustics play a huge role in sound quality. Hard surfaces like bare walls and large windows can cause echoes and reverberation, making sound muddy. Conversely, soft furnishings, carpets, and curtains absorb sound, creating a drier, clearer sound. Consider adding acoustic panels or even heavy blankets for temporary sound treatment if your room is particularly reflective. This can significantly improve karaoke audio quality. For instance, even adding a large rug can make a noticeable difference.
Using a Mixer for Greater Control
If your karaoke machine has limited controls, adding an external mixer can provide much more flexibility. A mixer allows for precise EQ adjustments, more sophisticated effects routing, and better control over multiple microphones. This is especially beneficial for groups or aspiring singers who want to truly optimize karaoke sound quality. Furthermore, mixers often have dedicated inputs for various instruments, expanding your setup’s capabilities. You can find many helpful resources on professional audio mixers on our Blog.
Feedback Suppression
Feedback is the bane of any live audio setup. While proper microphone placement helps, dedicated feedback suppressors (either built into higher-end machines or as external units) can automatically detect and eliminate feedback frequencies. This technology samples the audio and applies narrow EQ cuts to problem frequencies, allowing you to sing with confidence. In addition, some mixers include built-in feedback detection features.
Cables and Connections Matter
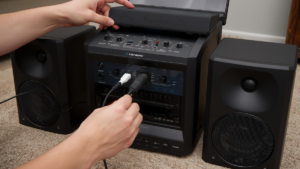
Believe it or not, the quality of your cables can impact sound. Use good quality, shielded cables to minimize interference and signal loss. Ensure all connections are secure and free from corrosion. Loose connections are a common cause of intermittent sound or buzzing noises. Therefore, periodically check all your cable connections. Investing in decent cables is a small but important step to improve karaoke audio quality.
Maintaining Your Equipment for Lasting Performance
Proper maintenance ensures your karaoke system continues to deliver excellent sound. A well-cared-for machine performs better and lasts longer. This is a vital aspect of enjoying consistent audio excellence.
Cleaning Microphones
Microphones can accumulate moisture and debris. Regularly wipe down your microphone with a clean, dry cloth. For dynamic microphones, you can often unscrew the grille and gently clean the foam windscreen. This prevents muffled sound and extends the mic’s life. Moreover, it’s hygienic, especially if multiple people use the same mic.
Speaker Care
Keep your speakers free of dust. Dust can impede cooling and affect component performance. Avoid placing speakers in direct sunlight or extreme temperatures. Also, ensure speaker wires are not kinked or frayed. Consequently, these simple steps will help maintain the integrity of your sound system. Regular checks can prevent minor issues from becoming major problems.
Software and Firmware Updates
For smart karaoke machines or those with digital components, regularly check for software or firmware updates. These updates often include performance enhancements, bug fixes, and new features that can further optimize karaoke sound quality. Keeping your system current ensures you benefit from the latest improvements. Therefore, make it a habit to check for updates periodically.
Conclusion
Achieving crystal clear vocals and a balanced audio mix for your karaoke performances is entirely within reach. By focusing on proper setup and placement, carefully fine-tuning your EQ and effects, and paying attention to volume balance, you can significantly enhance your singing experience. Remember, practice and experimentation are key to finding the perfect sound for your unique voice and room. With these professional tips, you’ll be well on your way to delivering show-stopping performances every time you hit the stage, transforming your home into the ultimate karaoke venue. To further enhance your setup, explore our Contact Us page for personalized recommendations or questions.
FAQ
How can I reduce feedback during my karaoke session?
To minimize feedback, keep the microphone angled away from the speakers, avoid pointing it directly at them, and ensure your microphone volume isn’t set too high. Also, check for proper speaker placement, making sure they are not too close to walls or corners.
What is the most important setting to adjust for vocal clarity?
The mid-range frequencies on your equalizer (EQ) are usually the most crucial for vocal clarity and presence. Adjusting these carefully can make your voice sound much clearer and more defined in the mix.
Should I use a lot of reverb on my vocals?
Generally, it’s best to use reverb sparingly. A small amount can add warmth and natural space to your voice, but too much can make your vocals sound distant, muddy, or washed out. Experiment with subtle settings first.
How do I balance my voice with the music track?
Start with both volumes low. Gradually increase the music volume to a comfortable level, then slowly raise your microphone volume until your voice sits clearly and comfortably on top of the music, without overpowering it. Listen from different spots in the room to confirm the balance.
Does room acoustics really affect how my karaoke sounds?
Yes, room acoustics have a significant impact. Hard surfaces cause echoes, making sound unclear, while soft furnishings absorb sound, leading to a clearer audio. Consider adding carpets, curtains, or even temporary acoustic panels to improve your room’s sound environment.