If you want a bigger screen and smoother streaming, learning how to connect karaoke machine Apple TV setups correctly makes a big difference. With the right cables and settings, you can enjoy clear lyrics, balanced sound, and an effortless home singing experience.
Many people already own an Apple TV for streaming movies and music. However, they do not realize how easily it can integrate with karaoke equipment. Fortunately, setup is simple once you understand the correct audio and video connections.
In this guide, you will learn step-by-step methods to connect karaoke machine Apple TV systems, optimize sound quality, and troubleshoot common issues.
Why Use Apple TV for Karaoke
Apple TV provides access to YouTube, Apple Music, and karaoke apps. Because it connects directly to your television, lyrics appear clearly on a large screen.
Large lyric displays improve timing and confidence. As a result, performances feel more natural.
When you connect karaoke machine Apple TV systems properly, you combine powerful streaming with strong audio output. This setup works well for both small gatherings and larger home parties.
Additionally, Apple TV offers stable streaming quality. Fewer buffering interruptions mean smoother performances.
Basic Equipment You Will Need
Before you connect karaoke machine Apple TV devices, gather essential components.
You will need:
- Apple TV with HDMI cable
- Television with HDMI input
- Karaoke machine with audio input
- RCA or AUX cables (depending on machine model)
- Microphones
Confirm compatibility between your karaoke system and available audio ports. Preparation reduces setup frustration.
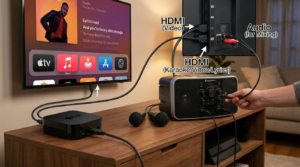
Method 1: Using HDMI for Video and RCA for Audio
The most common approach involves separating video and audio connections.
First, connect Apple TV to your television using the HDMI cable. This step handles video output and displays lyrics clearly.
Next, use RCA or AUX cables to route sound from your TV’s audio output into your karaoke machine’s input.
Once you connect karaoke machine Apple TV systems this way, your TV sends streaming music directly into the karaoke speaker system.
Adjust volume carefully to balance background music and microphone levels.
Checking Audio Output Settings
Navigate to your TV audio settings and select “External Speaker” or “Audio Out.”
Ensure the sound routes properly into your karaoke unit. Testing before guests arrive prevents interruptions.
Method 2: Connecting Through an AV Receiver
If you use a home theater system, connect Apple TV through your AV receiver first.
The receiver processes both video and audio signals. Then, route audio output from the receiver into your karaoke machine.
This setup improves sound clarity significantly. However, it requires careful cable management.
When you connect karaoke machine Apple TV using a receiver, label cables clearly to avoid confusion.
Proper organization ensures smoother troubleshooting later.
Method 3: Using Bluetooth Audio
Some modern karaoke systems support Bluetooth input.
In this case, pair Apple TV with your karaoke speaker directly. Navigate to Apple TV’s Bluetooth settings and select your device.
Although wireless connections reduce cable clutter, slight audio delay may occur.
If delay becomes noticeable, switch to wired connections. Stability remains crucial when you connect karaoke machine Apple TV systems for live singing.
Adjusting Microphone Levels
After completing connections, focus on microphone balance.
Set music volume first at moderate level. Then gradually raise microphone volume until vocals sound clear without distortion.
Avoid placing microphones too close to speakers. This prevents feedback noise.
Testing ensures your connect karaoke machine Apple TV setup functions smoothly during performances.
Syncing Lyrics and Audio
Occasionally, audio and lyrics may appear slightly out of sync.
If delay occurs, check TV audio processing settings. Disable extra sound enhancements that cause lag.
Using wired connections instead of Bluetooth often resolves synchronization issues.
Smooth syncing improves overall performance quality and prevents awkward timing gaps.
Using Karaoke Apps on Apple TV
Several apps support karaoke streaming directly on Apple TV.
Download reputable karaoke applications from the App Store. Many offer lyric display and pitch adjustment.
When you connect karaoke machine Apple TV with these apps, your setup becomes streamlined and convenient.
Subscription services may provide expanded song libraries. Choose one that fits your event needs.
Troubleshooting Common Problems
If no sound plays, check cable connections first. Ensure audio outputs match input ports.
If microphones produce echo feedback, lower microphone gain slightly.
Should video display properly but music remain silent, confirm TV audio output settings.
Careful troubleshooting keeps your connect karaoke machine Apple TV configuration running efficiently.
Enhancing Sound Quality
For better acoustics, position speakers at ear level. Avoid placing them directly against walls.
Use moderate echo and reverb settings if your karaoke system includes effects. Subtle enhancements improve vocal presence without masking pitch.
Additionally, reduce background noise in the room. Clear sound improves enjoyment for everyone.
Hosting a Smooth Karaoke Night
Prepare a playlist in advance. Queue songs directly within your chosen app.
Explain basic microphone etiquette to guests. Encourage moderate volume and proper mic distance.
Keep spare cables nearby in case of technical adjustments.
When you connect karaoke machine Apple TV thoughtfully, hosting becomes stress-free and enjoyable.
Advantages of This Setup
Large lyric display enhances visibility for group singing.
Streaming access expands song choices instantly.
Integrated home systems provide powerful sound without extra purchases.
Overall, this setup offers flexibility and professional-like performance quality at home.
Conclusion
Learning how to connect karaoke machine Apple TV systems transforms your living room into a full karaoke stage. With simple cable routing, proper audio adjustments, and thoughtful preparation, you can enjoy seamless singing nights anytime.
Use HDMI for video clarity and route audio correctly for balanced sound. Test equipment before guests arrive and troubleshoot proactively.
Once configured properly, this setup provides large-screen lyrics, powerful sound, and endless song options.
With careful planning and the right connections, your karaoke nights will feel polished, fun, and unforgettable.
FAQ
1. Do I need special cables for this setup?
You typically need an HDMI cable and either RCA or AUX cables, depending on your karaoke machine inputs.
2. Can I use Bluetooth instead of wired connections?
Yes, but wired connections often provide more stable audio with less delay.
3. Why is there a delay between lyrics and sound?
Audio processing settings on your TV may cause lag. Disable enhancements or use wired audio for better sync.
4. Can I use Apple Music for karaoke tracks?
Yes. Many users stream instrumental versions of songs directly through Apple Music or karaoke apps.
5. Is an AV receiver necessary?
No. It improves sound quality but is optional for most home setups.