Learning how to Connect Karaoke System equipment to a home theater receiver can dramatically improve your sound quality. Instead of relying on small built-in speakers, you can use your full surround setup. As a result, vocals sound richer and music feels more immersive.
Many people assume this process is complicated. However, once you understand the connections, setup becomes straightforward. Because modern receivers offer multiple input options, integration is easier than ever.
Whether you use a standalone karaoke machine, mixer, or microphone system, you can Connect Karaoke System components correctly with the right cables and settings.
This guide walks you through every step clearly and safely.
Understand Your Equipment First
Before you Connect Karaoke System gear, identify the devices involved. Typically, you will have three main components:
- Karaoke machine or mixer
- Microphones
- Home theater receiver
Some karaoke systems include built-in speakers. Others function as audio sources only. Therefore, confirm whether your unit has “Audio Out” ports.
Next, inspect your receiver. Look for available inputs such as AUX, RCA, HDMI, or optical. Because receivers vary, knowing your model’s input options prevents confusion later.
Additionally, check whether your karaoke unit supports line-level output. Most machines provide red and white RCA outputs.
Once you understand the available ports, connection decisions become much easier.
Choose the Right Connection Method
There are several ways to Connect Karaoke System equipment to a receiver. The best method depends on available ports.
RCA Connection (Most Common Option)
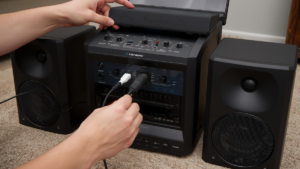
RCA cables feature red and white plugs. These carry stereo audio signals.
To use this method, plug the RCA cables into the “Audio Out” on your karaoke machine. Then connect the other ends into an available “Audio In” input on your receiver.
Select the matching input source on the receiver. As a result, your karaoke audio plays through home theater speakers.
RCA offers simple, reliable analog sound. For most users, this method works perfectly.
HDMI Connection (For Video and Audio)
If your karaoke machine supports HDMI output, use it for both sound and lyrics display.
Connect the HDMI cable from the karaoke system to an available HDMI input on your receiver. Then run another HDMI cable from the receiver to your TV.
This setup allows you to Connect Karaoke System audio and video simultaneously. Therefore, lyrics appear on the TV while sound plays through surround speakers.
HDMI provides cleaner digital audio compared to analog connections.
Optical or Digital Audio Option
Some higher-end machines include optical output. If both devices support optical cables, you can connect them easily.
Plug the optical cable into the karaoke system’s digital output. Then connect it to the receiver’s optical input.
Because optical signals reduce interference, audio clarity may improve.
However, not all karaoke systems support this feature. Always verify compatibility first.
Configure Receiver Settings Correctly
After you Connect Karaoke System cables, adjust receiver settings properly.
Select the correct input source that matches your cable connection. For example, if you used AUX, switch to AUX mode.
Next, adjust sound mode settings. Many receivers default to surround sound. However, karaoke often sounds best in stereo mode.
Switch to “2-channel stereo” or “direct” mode. This setting delivers balanced vocal clarity.
Reduce excessive bass if feedback occurs. Additionally, test volume levels gradually to avoid sudden distortion.
Correct configuration ensures optimal performance.
Connect Microphones the Right Way
Microphones usually connect directly to the karaoke machine or mixer, not the receiver.
When you Connect Karaoke System components, ensure microphones plug into the proper mic input on the karaoke unit.
Avoid plugging microphones into the receiver unless it specifically supports mic inputs. Most receivers lack this feature.
If your karaoke setup includes a separate mixer, connect microphones to the mixer first. Then route the mixer output into the receiver.
This setup allows you to control vocal levels independently.
Proper microphone routing prevents distortion and keeps sound balanced.
Prevent Feedback and Sound Issues
After you Connect Karaoke System equipment, test for feedback.
Feedback happens when microphones pick up sound from speakers repeatedly. To prevent this:
- Place speakers in front of performers
- Lower microphone gain slightly
- Avoid pointing microphones at speakers
Additionally, maintain moderate receiver volume. Increasing volume excessively increases feedback risk.
Room acoustics also matter. Carpets and curtains absorb sound, reducing echo.
Testing carefully ensures smooth performance during your event.
Balance Music and Vocals
Sound balance determines karaoke quality.
When you Connect Karaoke System audio to a receiver, music volume may overpower vocals initially.
Adjust microphone gain on the karaoke unit. Then fine-tune master volume on the receiver.
Aim for vocals slightly above background music. As a result, singers remain clear without shouting.
Use equalizer controls if available. Boost midrange frequencies slightly for clearer vocals.
Balanced audio creates a professional feel.
Display Lyrics on Your TV
Most users want lyrics visible on a larger screen.
If your karaoke machine has HDMI output, connect it through the receiver to your TV. Alternatively, use RCA video cables directly to the TV.
When you Connect Karaoke System video properly, singers can read lyrics comfortably from across the room.
Ensure the TV input matches the connection type.
Clear video improves overall performance confidence.
Troubleshooting Common Problems
Sometimes sound issues occur after setup.
If no sound plays, double-check input selection. Ensure cables are fully inserted.
When you Connect Karaoke System components and hear distortion, lower gain settings first.
If audio lags behind video, check HDMI sync settings on the receiver.
Static noise may indicate loose cables or interference. Replace damaged wires promptly.
Systematic troubleshooting resolves most problems quickly.
Using a Mixer for Advanced Control
For enhanced control, add a mixer between devices.
Connect karaoke audio output into the mixer. Then run the mixer output into the receiver.
This setup allows advanced tone shaping and multiple microphone inputs.
When you Connect Karaoke System equipment through a mixer, you gain flexibility.
Adjust EQ, echo, and mic levels independently.
Although optional, mixers improve performance for larger gatherings.
Safety and Equipment Care
Protect your equipment during setup.
Turn off devices before connecting cables. Sudden electrical surges may damage components.
After you Connect Karaoke System gear, avoid maximum volume immediately. Increase gradually.
Store cables neatly after use. Tangled wires wear out faster.
Routine care extends system lifespan significantly.
Test Everything Before Guests Arrive
Preparation prevents stress.
Before hosting, power on all devices and test a full song.
When you Connect Karaoke System equipment in advance, you avoid last-minute confusion.
Check microphone clarity, lyric display, and speaker balance.
Walk around the room while singing to confirm even sound coverage.
Early testing ensures smooth performance later.
Conclusion: Enjoy Powerful Karaoke at Home
Knowing how to Connect Karaoke System components to a home theater receiver unlocks powerful, immersive sound. Instead of relying on small speakers, you use your full audio system.
By selecting proper cables, configuring settings correctly, and balancing sound carefully, you create professional-quality karaoke at home.
Additionally, proper microphone routing and feedback prevention keep vocals clean and enjoyable.
Take your time during setup. Test connections thoroughly. Once everything works smoothly, your living room transforms into a full-scale performance venue.
With the right setup, every karaoke night sounds bigger, clearer, and more exciting.
FAQ
FAQ
- Can I plug microphones directly into my receiver?
Most receivers do not support microphone inputs. Connect mics to the karaoke machine or mixer instead. - What is the easiest connection method?
RCA cables provide the simplest and most reliable audio connection for most home setups. - Why does my system produce feedback?
Feedback occurs when microphones capture speaker output. Adjust placement and reduce gain slightly. - Should I use surround sound mode for karaoke?
Stereo mode usually provides clearer vocals and better balance than surround sound settings. - Do I need a mixer for home use?
A mixer is optional but helpful if you want more control over multiple microphones and audio levels.