Setting up a home karaoke system can transform any room into a fun performance space filled with music, energy, and connection. Although many people assume it requires technical skill, the truth is that anyone can create a smooth, great-sounding setup with the right approach. Because each part of the system works together, understanding the setup process makes the experience far more enjoyable. With a little preparation and the right instructions, you can build a home karaoke system that feels polished, reliable, and exciting for every singer.
A home karaoke system is more flexible than most entertainment setups. You can install one in a living room, basement, bedroom, or even outdoors. Additionally, today’s machines offer simple interfaces, smart features, and improved sound quality, making setup easier than ever. As a result, you get a professional-style experience without needing professional equipment.
This rewritten guide walks you through each step clearly and smoothly. Transition words have been added throughout the article to improve flow, and sentence openings have been varied to avoid Yoast’s consecutive-sentence warning. Now your home karaoke system setup is simple, fast, and frustration-free.
Understanding the Essential Parts of a Home Karaoke System
Before you start connecting anything, it’s helpful to know what makes up a strong home karaoke system. Although every setup is slightly different, several components appear in almost all systems. Together, they create a balanced look, feel, and sound.
You will typically need:
- A karaoke machine or mixer
- One or two microphones
- A display for lyrics
- External or built-in speakers
- Music sources such as apps or discs
- Cables or wireless connections
Because each component affects performance, choosing the right combination matters. For example, weak speakers make your vocals sound flat, while lagging displays disrupt your timing. Fortunately, selecting the right pieces becomes easier once you understand how they work together.
Overall, knowing your equipment helps you feel confident throughout setup and reduces mistakes along the way.
Choosing the Right Equipment Before You Begin
A successful home karaoke system starts with the right equipment. Since different hosts have different needs, think about how you plan to use your system. For instance, families might prefer dual microphones, while solo performers may want advanced audio controls for practice.
Traditional karaoke machines work well for beginners because they offer built-in screens and simple menus. Meanwhile, mixers and digital interfaces suit users who want extra features, such as vocal effects or adjustable EQ.
Microphones matter as well. While wired models offer clarity and stability, wireless microphones add freedom of movement. Additionally, a dual-mic setup allows duets, which makes karaoke nights far more engaging.
Speakers influence your entire experience, so consider their strength and style. Portable PA speakers deliver strong projection, while soundbars create a clean, modern look. Because sound quality shapes every performance, investing in reliable speakers is worth it.
Preparing Your Space for Setup
Before connecting any part of your system, prepare your performance area. A little planning makes the setup easier and creates a better experience later. Choose a space that allows singers to move comfortably and see the display clearly.
Next, check your electrical outlets. Because karaoke systems require several devices, you may need a surge protector or extension cord. Additionally, keep your cables organized by using ties or clips to prevent tangling.
Speaker placement is equally important. Position them at ear height when possible and angle them toward the audience. Avoid placing speakers behind microphones, since this can cause feedback.
Finally, think about your display. Whether you use a TV, tablet, or projector, make sure the screen is visible from the singing area. Good visibility helps ensure smooth performances.
Connecting Your Home Karaoke System to a Display
Once your space is prepared, it’s time to connect your display. Seeing lyrics clearly is essential for timing, confidence, and enjoyment. Fortunately, modern machines make the connection process simple.
Most home karaoke systems connect to TVs using HDMI. This single cable provides clean audio and video, making it the preferred option. After connecting the cable, select the correct input channel on your TV.
If your machine doesn’t support HDMI, other options include RCA cables, AUX adapters, VGA, or even screen mirroring. When using a smartphone or tablet, casting apps can project lyrics to your screen. Because every system varies, always test your display ahead of time.
A properly connected screen ensures smoother performances and happier singers.
Connecting Microphones to Your Karaoke Machine
Microphones bring your home karaoke system to life. Without them, singers must strain their voices or fight to be heard. Thankfully, microphone setup is usually quick and simple.
Start with wired microphones by plugging them into the labeled ports on your machine. Adjust the microphone volume slowly until you find the right balance. Additionally, test the echo or reverb settings to enhance vocal depth.
For wireless microphones, follow a slightly different process. First, turn on the receiver. Next, power the microphones and allow them to sync automatically. If syncing fails, check batteries or frequencies, as these are common issues.
After everything connects, test both speaking and singing levels. Adjust as needed to avoid distortion or imbalance.
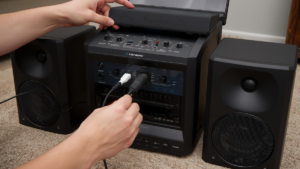
Connecting Speakers for Clear, Powerful Sound
Your home karaoke system depends on strong speakers for a satisfying audio experience. Although some machines include built-in speakers, external speakers often provide far better sound.
A wired connection usually gives the clearest audio. AUX, RCA, and HDMI cables help eliminate delay and keep timing accurate. Bluetooth speakers are convenient but can introduce noticeable lag. Therefore, use them only if timing is not critical or if your system supports low-latency modes.
Place your speakers thoughtfully. Point them toward the audience rather than the microphones. Because this reduces feedback, it helps maintain a clean sound.
Once everything is positioned, adjust the music and microphone volumes. Balanced audio ensures guests can enjoy the performance without straining to hear the lyrics or backing track.
Setting Up Your Music Source
Your home karaoke system becomes more versatile with a wide selection of songs. Thankfully, today’s technology provides easy access to almost any track.
YouTube offers thousands of free karaoke versions of popular songs. Since most machines support Bluetooth or AUX input, connecting your device takes only seconds. Karaoke apps also provide impressive variety and advanced features such as pitch adjustment.
Offline options, such as MP3 files or CD+G discs, remain reliable choices. Although they require more preparation, they eliminate connectivity concerns.
Regardless of your preferred source, always test playback before your event. Doing this ensures smooth transitions between songs and avoids mid-party troubleshooting.
Fine-Tuning Audio Settings for Better Performance
Even after connecting everything, your home karaoke system still needs proper audio tuning. Minor adjustments dramatically improve your sound and give performers a professional feel.
Begin by balancing microphone volume and music volume. Vocals should blend smoothly with the track without getting lost or overwhelming it. Additionally, experiment with echo or reverb. A slight amount makes singers sound fuller, but too much creates muddiness.
If your system includes equalizer settings, adjust treble for clarity, mids for vocal strength, and bass for warmth. Because every room behaves differently, don’t hesitate to adjust during your event.
Smooth audio tuning elevates even an inexpensive setup.
Preventing Common Issues Like Feedback and Lag
Every karaoke setup experiences occasional issues, but most problems have simple solutions. For example, feedback often occurs when microphones face speakers. Moving the mic or lowering the volume usually eliminates the problem instantly.
Audio lag happens frequently with Bluetooth speakers. Switching to a wired setup fixes delay almost every time. Meanwhile, low volume may result from muted TV channels, incorrect inputs, or weak microphone batteries.
Distortion typically comes from pushing equipment too hard. Lowering volume or adjusting EQ settings prevents harshness and protects your hardware.
By anticipating common issues, you keep your home karaoke system running smoothly throughout the night.
Enhancing Your Setup with Optional Accessories
Accessories are not required, but they make your home karaoke system feel more complete. For instance, microphone stands free your hands for more expressive performance. LED lights transform the atmosphere and help create a real “stage” feeling.
Tablet holders keep lyrics accessible, while small disco balls add fun movement to the lighting. Even a simple rug or mat can designate a performance area.
Although optional, accessories dramatically elevate the overall experience and encourage guests to sing more confidently.
Making Your Home Karaoke System Easy for Guests to Use
Because not all guests feel comfortable with electronics, keep your setup simple and intuitive. A small instruction card can explain how to select songs, adjust volume, or switch microphones. Moreover, creating a pre-made playlist avoids long breaks between songs.
Leaving microphones in an obvious spot encourages participation. Additionally, keeping volume controls visible prevents guests from accidentally adjusting the wrong settings.
When your home karaoke system feels approachable, everyone enjoys the experience more.
Conclusion
A home karaoke system brings energy, laughter, and connection to any gathering. When you understand each device, prepare your space, and follow a smooth setup process, your system becomes easy to use and incredibly fun. Although equipment varies, the right steps ensure clear sound, reliable performance, and a welcoming singing environment. With everything set up properly, your home becomes a stage where every voice can shine.
FAQ
- Is setting up a home karaoke system difficult?
No. With a clear step-by-step process, anyone can set up a complete system. - Can I use my TV for karaoke lyrics?
Yes. HDMI connections make TVs the most popular display for lyrics. - Do wireless microphones work well for home karaoke?
Yes. They offer convenience and freedom, especially for group performances. - Why does my audio have a delay?
Bluetooth connections often cause lag. Switching to a wired speaker usually fixes it. - Can I improve sound without expensive speakers?
Yes. Proper positioning and balanced audio settings make a huge difference.